System Reference Samples and Demos on STM32MP157C/F-DK2 board
Based on a fork of the yocto [meta-st-stm32mp-oss] (https://github.com/STMicroelectronics/meta-st-stm32mp-oss) environment,designed to update and test upstream code on STM32MP boards,
Prerequisite
Some specifics package could be needed to build the ST images. For details refer to
Installation
Create the structure of the project
mkdir stm32mp15-demo
cd stm32mp15-demo
mkdir stm32mp1_distrib_oss
mkdir zephy_rpmsg_multi_services
At this step you should see following folder hierarchy:
stm32mp15-demo
    |___ stm32mp1_distrib_oss
    |___ zephy_rpmsg_multi_services
Generate the stm32mp15 image
Install stm32mp1_distrib_oss Nanbield
From the stm32mp15-demo directory
export YOCTO_VER=scarthgap
cd stm32mp1_distrib_oss
mkdir -p layers/meta-st

git clone https://git.yoctoproject.org/git/poky layers/poky
cd layers/poky
git checkout -b WORKING origin/$YOCTO_VER
cd -

git clone https://github.com/openembedded/meta-openembedded.git layers/meta-openembedded
cd layers/meta-openembedded
git checkout -b WORKING origin/$YOCTO_VER
cd -

git clone https://github.com/STMicroelectronics/meta-st-stm32mp-oss.git layers/meta-st/meta-st-stm32mp-oss
cd layers/meta-st/meta-st-stm32mp-oss
git checkout -b WORKING origin/$YOCTO_VER
cd -
Initialize the Open Embedded build environment
The OpenEmbedded environment setup script must be run once in each new working terminal in which you use the BitBake or devtool tools (see later) from stm32mp15-demo/stm32mp1_distrib_oss directory
source ./layers/poky/oe-init-build-env build-stm32mp15-disco-oss

bitbake-layers add-layer ../layers/meta-openembedded/meta-oe
bitbake-layers add-layer ../layers/meta-openembedded/meta-perl
bitbake-layers add-layer ../layers/meta-openembedded/meta-python
bitbake-layers add-layer ../layers/meta-st/meta-st-stm32mp-oss

echo "MACHINE = \"stm32mp15-disco-oss\"" >> conf/local.conf
echo "DISTRO = \"nodistro\"" >> conf/local.conf
echo "PACKAGE_CLASSES = \"package_deb\" " >> conf/local.conf
Build stm32mp1_distrib_oss image
From stm32mp15-demo/stm32mp1_distrib_oss/build-stm32mp15-disco-oss/ directory
bitbake core-image-base
Note that
to build around 30 GB is needed
building the distribution can take more than 2 hours depending on performance of the PC.
Install stm32mp1_distrib_oss
From ‘stm32mp15-demo/stm32mp1_distrib_oss/build-stm32mp15-disco-oss/’ directory,populate your microSD card inserted on your HOST PC using command
cd tmp-glibc/deploy/images/stm32mp15-disco-oss/
# Unmount potential media mounted from the sdcard. Replace <device> by mmcblk<X> (X = 0,1..) or
#sd<Y>( Y = b,c,d,..) depending on the connection
sudo eject /dev/<device>
# Flash wic image on your sdcard. Replace <device> by mmcblk<X> (X = 0,1..) or
#sd<Y>( Y = b,c,d,..) depending on the connection
sudo dd if=core-image-base-stm32mp15-disco-oss.rootfs.wic of=/dev/<device> bs=8M conv=fdatasync status=progress
Generate the Zephyr rpmsg multi service example
Initialize the Zephyr environment
Refer to zephyr example readme article.
Build the Zephyr image
From the zephy_rpmsg_multi_services directory
west build -b stm32mp157c_dk2 openamp-system-reference/examples/zephyr/rpmsg_multi_services
For details refer to rpmsg_multi_services readme article.
Install the Zephyr binary on the sdcard
The Zephyr sample binary is available in the sub-folder of build directory stm32mp15-demo/zephy_rpmsg_multi_services/build/zephyr/rpmsg_multi_services.elf. It needs to be installed on the “rootfs” partition of the sdcard
sudo cp build/zephyr/rpmsg_multi_services.elf <mountpoint>/rootfs/lib/firmware/
Don’t forget to properly unmoumt the sdcard partitions.
sudo eject /dev/<device>
Build and install the rpmsg-utils tools
This chapter explains how to build and install the rpmsg-utils for the STM32MP157C/F-DK2 board.
- Download XXXX-none-linux-gnu AArch32 GNU/Linux target cross toolchains from:
Build the rpmsg-utils binaries:
# <compiler path> has to be updated by the path of the arm toolchain.
export CC="<compiler path>/bin/arm-none-linux-gnueabihf-gcc -mthumb -mfpu=neon-vfpv4 -mfloat-abi=hard -mcpu=cortex-a7"
make
Install the tools on the sdcard .. code-block:: console
sudo cp rpmsg_destroy_ept rpmsg_export_dev rpmsg_export_ept rpmsg_ping <mountpoint>/rootfs/usr/bin/
Don’t forget to properly unmoumt the sdcard partitions.
sudo eject /dev/<device>
Demos
Start the demo environment
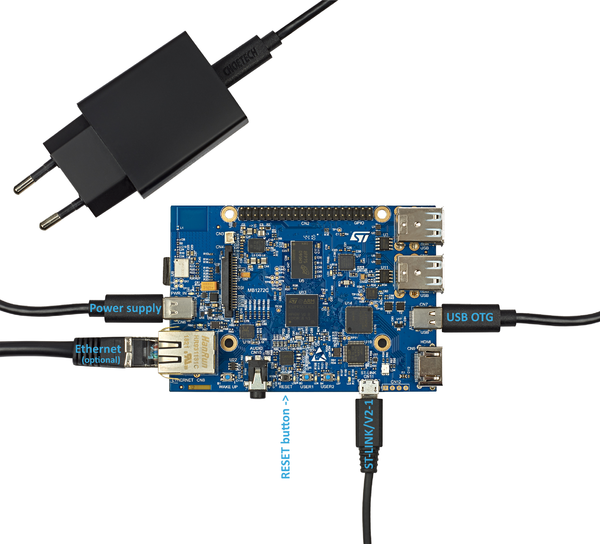
Power on the stm32mp157C/F-dk2 board, and wait login prompt on your serial terminal
stm32mp15-disco-oss login: root
There are 2 ways to start the coprocessor:
During the runtime, by the Linux remoteproc framework
root@stm32mp15-disco-oss:~# cat /sys/class/remoteproc/remoteproc0/state
offline
root@stm32mp15-disco-oss:~# echo rpmsg_multi_services.elf > /sys/class/remoteproc/remoteproc0/firmware
root@stm32mp15-disco-oss:~# echo start >/sys/class/remoteproc/remoteproc0/state
root@stm32mp15-disco-oss:~# cat /sys/class/remoteproc/remoteproc0/state
running
In the boot stages, by the U-Boot remoteproc framework
Prerequisite Copy the firmware in the bootfs partition
root@stm32mp15-disco-oss:~# cp /lib/firmware/rpmsg_multi_services.elf /boot/
root@stm32mp15-disco-oss:~# sync
Boot the board and go in U-Boot console
root@stm32mp15-disco-oss:~# rebootEnter in the U-boot console by interrupting the boot with any keyboard key.
STM32MP>Load and start the Coprocessor firmware:
STM32MP> load mmc 0#bootfs ${kernel_addr_r} rpmsg_multi_services.elf
816776 bytes read in 148 ms (5.3 MiB/s)
STM32MP> rproc init
STM32MP> rproc load 0 ${kernel_addr_r} ${filesize}
Load Remote Processor 0 with data@addr=0xc2000000 816776 bytes: Success!
STM32MP> rproc start 0
STM32MP> run bootcmd
To automatically load the firmware by U-Boot, refer to the STMicorelectronics wiki.
Check that the remoteproc state is “detached”
root@stm32mp15-disco-oss:~# cat /sys/class/remoteproc/remoteproc0/state
detached
Attach the Linux remoteproc framework to the Zephyr
root@stm32mp15-disco-oss:~# echo start >/sys/class/remoteproc/remoteproc0/state
root@stm32mp15-disco-oss:~# cat /sys/class/remoteproc/remoteproc0/state
attached
The communication with the coprocessor is not initialized, following traces on console are observed:
root@stm32mp15-disco-oss:~#
[   54.495343] virtio_rpmsg_bus virtio0: rpmsg host is online
[   54.500044] virtio_rpmsg_bus virtio0: creating channel rpmsg-client-sample addr 0x400
[   54.507923] virtio_rpmsg_bus virtio0: creating channel rpmsg-tty addr 0x401
[   54.514795] virtio_rpmsg_bus virtio0: creating channel rpmsg-raw addr 0x402
[   54.548954] rpmsg_client_sample virtio0.rpmsg-client-sample.-1.1024: new channel: 0x402 -> 0x400!
[   54.557337] rpmsg_client_sample virtio0.rpmsg-client-sample.-1.1024: incoming msg 1 (src:    0x400)
[   54.565532] rpmsg_client_sample virtio0.rpmsg-client-sample.-1.1024: incoming msg 2 (src:    0x400)
[   54.581090] rpmsg_client_sample virtio0.rpmsg-client-sample.-1.1024: incoming msg 3 (src:    0x400)
[   54.588699] rpmsg_client_sample virtio0.rpmsg-client-sample.-1.1024: incoming msg 4 (src:    0x400)
[   54.599424] rpmsg_client_sample virtio0.rpmsg-client-sample.-1.1024: incoming msg 5 (src:    0x400)
...
This informs that following rpmsg channels devices have been created:
a rpmsg-client-sample device
a rpmsg-tty device
a rpmsg-raw device
Run the multi RPMsg services demo
Refer to rpmsg multi service article.